HTTP Archive format (ULTIMATE ALL)
HTTP Archive (HAR) format files are an industry standard for exchanging information about HTTP
requests and HTTP responses. A HAR file's content is JSON formatted, containing browser interactions
with a web site. The file extension .har is commonly used.
The HAR files can be used to perform web API Fuzz Testing as part of your GitLab CI/CD pipelines.
WARNING: A HAR file stores information exchanged between web client and web server. It could also store sensitive information such as authentication tokens, API keys, and session cookies. We recommend that you review the HAR file contents before adding them to a repository.
HAR file creation
You can create HAR files manually or by using a specialized tool for recording web sessions. We recommend using a specialized tool. However, it is important to make sure files created by these tools do not expose sensitive information, and can be safely used.
The following tools can be used generate a HAR file based on your network activity. They automatically record your network activity and generate the HAR file:
- GitLab HAR Recorder.
- Insomnia API Client.
- Fiddler debugging proxy.
- Safari web browser.
- Chrome web browser.
- Firefox web browser.
WARNING: HAR files may contain sensitive information such as authentication tokens, API keys, and session cookies. We recommend that you review the HAR file contents before adding them to a repository.
GitLab HAR Recorder
GitLab HAR Recorder is a command line tool for recording HTTP messages and saving them to HTTP Archive (HAR) files. For more details about the GitLab HAR Recorder, see the homepage.
Install GitLab HAR Recorder
Prerequisites:
- Install Python 3.6 or greater.
- For Microsoft Windows, you must also install
Microsoft Visual C++ 14.0. It's included with Build Tools for Visual Studio from Visual Studio Downloads page. - Install HAR Recorder.
Install GitLab HAR Recorder:
pip install gitlab-har-recorder --extra-index-url https://gitlab.com/api/v4/projects/22441624/packages/pypi/simpleCreate a HAR file with GitLab HAR Recorder
- Start recorder with the proxy port and HAR filename.
- Complete the browser actions, using the proxy.
- Make sure proxy is used!
- Stop the recorder.
To verify the HAR contains all requests, use an online HAR viewer, for example:
Insomnia API Client
Insomnia API Client is an API design tool that among many uses, helps you to design, describe, and test your API. You can also use it to generate HAR files that can be used in Web API Fuzz Testing.
Create a HAR file with the Insomnia API Client
- Define or import your API.
- Postman v2.
- Curl.
- OpenAPI v2, v3.
- Verify each API call works.
- If you imported an OpenAPI specification, go through and add working data.
- Select API > Import/Export.
- Select Export Data > Current Workspace.
- Select requests to include in the HAR file.
- Select Export.
- In the Select Export Type dropdown list select HAR -- HTTP Archive Format.
- Select Done.
- Enter a location and filename for the HAR file.
Fiddler debugging proxy
Fiddler is a web debugger tool. It captures HTTP and HTTP(S) network traffic and allows you to examine each request. It also lets you export the requests and responses in HAR format.
Create a HAR file with Fiddler
- Go to the Fiddler home page and sign in. If you don't already have an account, first create an account.
- Browse pages that call an API. Fiddler automatically captures the requests.
- Select one or more requests, then from the context menu, select Export > Selected Sessions.
- In the Choose Format dropdown list select HTTPArchive v1.2.
- Enter a filename and select Save.
Fiddler shows a popup message confirming the export has succeeded.
Safari web browser
Safari is a web browser maintained by Apple. As web development evolves, browsers support new capabilities. With Safari you can explore network traffic and export it as a HAR file.
Create a HAR file with Safari
Prerequisites:
- Enable the
Developmenu item.- Open Safari's preferences. Press Command+, or from the menu, select Safari > Preferences....
- Select Advanced tab, then select
Show Develop menu item in menu bar. - Close the Preferences window.
- Open the Web Inspector. Press Option+Command+i, or from the menu, select Develop > Show Web Inspector.
- Select the Network tab, and select Preserve Log.
- Browse pages that call the API.
- Open the Web Inspector and select the Network tab
- Right-click on the request to export and select Export HAR.
- Enter a filename and select Save.
Chrome web browser
Chrome is a web browser maintained by Google. As web development evolves, browsers support new capabilities. With Chrome you can explore network traffic and export it as a HAR file.
Create a HAR file with Chrome
- From the Chrome context menu, select Inspect.
- Select the Network tab.
- Select Preserve log.
- Browse pages that call the API.
- Select one or more requests.
- Right-click and select Save all as HAR with content.
- Enter a filename and select Save.
- To append additional requests, select and save them to the same file.
Firefox Web Browser
Firefox is a web browser maintained by Mozilla. As web development evolves, browsers support new capabilities. With Firefox you can explore network traffic and export it as a HAR file.
Create a HAR file with Firefox
- From the Firefox context menu, select Inspect.
- Select the Network tab.
- Browse pages that call the API.
- Check the Network tab and confirm requests are being recorded. If there is a message
Perform a request or Reload the page to see detailed information about network activity, select Reload to start recording requests. - Select one or more requests.
- Right-click and select Save All As HAR.
- Enter a filename and select Save.
- To append additional requests, select and save them to the same file.
HAR verification
Before using HAR files it's important to make sure they don't expose any sensitive information.
For each HAR file you should:
- View the HAR file's content
- Review the HAR file for sensitive information
- Edit or remove sensitive information
View HAR file contents
We recommend viewing a HAR file's content in a tool that can present its content in a structured way. Several HAR file viewers are available online. If you would prefer not to upload the HAR file, you can use a tool installed on your computer. HAR files used JSON format, so can also be viewed in a text editor.
Tools recommended for viewing HAR files include:
- HAR Viewer - (online)
- Google Admin Toolbox HAR Analyzer - (online)
- Fiddler - local
- Insomnia API Client - local
Review HAR file content
Review the HAR file for any of the following:
- Information that could help to grant access to your application, for example: authentication tokens, authentication tokens, cookies, API keys.
- Personally Identifiable Information (PII).
We strongly recommended that you edit or remove it any sensitive information.
Use the following as a checklist to start with. It's not an exhaustive list.
- Look for secrets. For example: if your application requires authentication, check common locations
or authentication information:
- Authentication related headers. For example: cookies, authorization. These headers could contain valid information.
- A request related to authentication. The body of these requests might contain information such as user credentials or tokens.
- Session tokens. Session tokens could grant access to your application. The location of these token could vary. They could be in headers, query parameters or body.
- Look for Personally Identifiable Information
- For example, if your application retrieves a list of users and their personal data: phones, names, emails.
- Authentication information might also contain personal information.
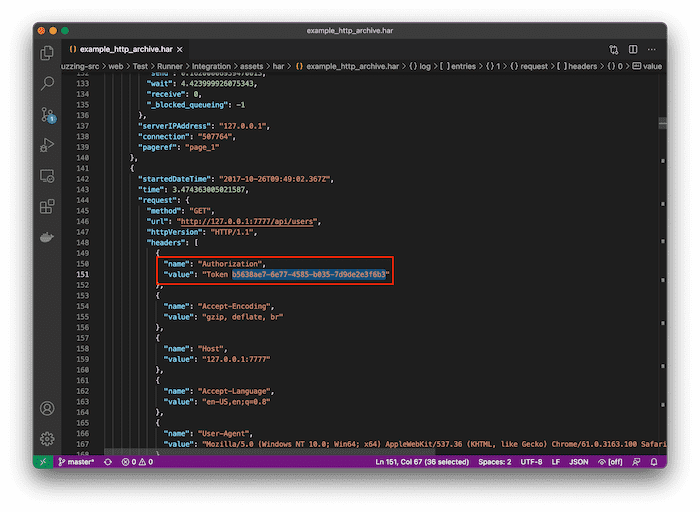
Edit or remove sensitive information
Edit or remove sensitive information found during the HAR file content review. HAR files are JSON files and can be edited in any text editor.
After editing the HAR file, open it in a HAR file viewer to verify its formatting and structure are intact.
The following example demonstrates use of Visual Studio Code text editor to edit an Authorization token found in a header.